

How To Repair Water Intake Valave On Boat Livewell
Replacing Thru-Hulls and Seacocks
Tip: If you would like a higher resolution or larger photo simply click on the picture and it volition become bigger.
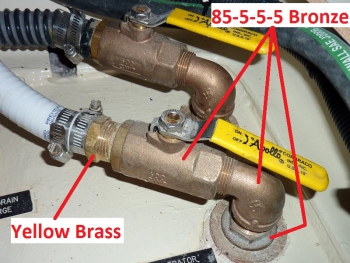
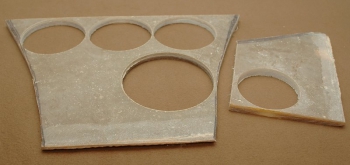
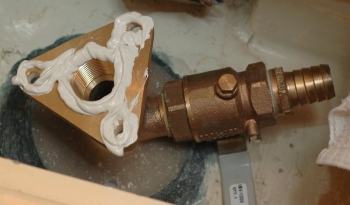
A Poor Idea
The motion-picture show on the left is what not to do if starting from scratch and installing new seacocks. If your thru-hulls and valves, on your boat, are installed & expect similar to this configuration, you lot're not alone. This photo was taken on a brand new 2022 production sailboat and this installation does not meet ABYC H-27 standards, despite this builder challenge to build to ABYC standards.
Unfortunately, for many owners of production boats, the factories cutting many corners to salve money, proper flanged seacocks existence one of them. This is understandable equally the cost savings over many hundreds of boats is huge to the manufacturer. As sheer luck has information technology an installation like this can go far beyond the warranty flow and then the manufacturer is washed with it. While information technology may make beyond the warranty period this is nowhere near as strong every bit a flanged seacock.
A proper seacock installation involves more than only a thru-hull/peel fitting/mushroom-head, as some refer to them, and a valve. The problem becomes more than complicated when you learn why this is not necessarily the safest mode to install a seacock.
The vast majority of all bachelor thru-hull fittings accept what's referred to every bit a directly thread or NPS (National Pipage Direct Thread), and the vast majority of all ball valves are a tapered thread or NPT (National Pipe Tapered Thread). NPS thread and NPT thread are not intended to exist used together. Many unknowing boaters sadly know nothing near NPT or NPS threads and as such often employ the 2 together quite incorrectly.
In curt, a proper seacock should take a female NPS flange that is physically bolted to the hull to which the NPS directly thread thru-hull or mushroom head is then threaded into.
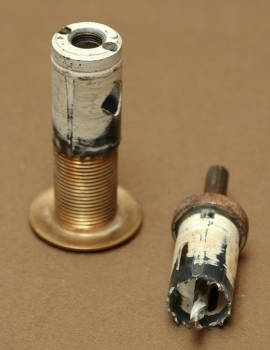
Another major problem with this installation is the mismatching of metals below the waterline. That hose barb is yellowish brass and not bronze. This particular architect claimed in 2022 to build their vessels to ABYC standards but the ABYC H-27 standard / UL 1121 standards specifically states that all metals shall exist galvanically compatible.
UL-1121
"The components of a through-hull fitting or sea valve shall be formed of galvanically compatible materials having the force and resistance to corrosion necessary to withstand intended and abnormal use to which they are likely to be subjected."
Here's the trouble, sixty/40 xanthous brass and 85-5-5-5 marine bronze bronze are non galvanically compatible and never have been. The 60/40 brass volition become the anodic metallic. ABYC compliant build my a$$!
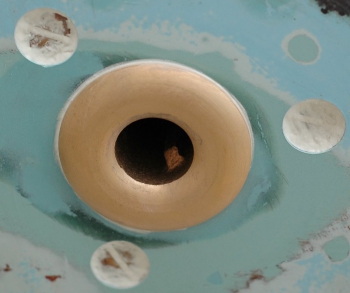
Please recollect this was a 2022 vessel. The picture below, of the broken thru-hull, comes from this same architect.
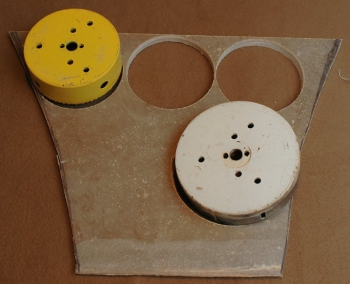
A Much Better Idea
While both this photo, and the previous photo, were taken on my workbench the plywood is representative of the hull of your gunkhole and the bronze fittings of 2 very typical installation methods used today. In this photo one tin can hands see the major differences in how both of these installations are affixed to the hull.
This photo is representative of a proper seacock installation with a through-bolted flange and the previous photo of a not-so-good installation method with no flange and mismatched threads.

Removing the Old Thru-Hulls
- First remove any hose clamps attached to the hose.
- Next remove the hose from the valve.
- Using pipe wrenches remove the valve from the thru-hull.
- Using pipe wrenches or in some locations a chisel remove the locking nut from the thru-hull.
- Utilize heat in the form of a heat gun to the exterior of the mushroom caput part of the thru-hull.
- While it's still hot use the step wrench to break the thru-hull complimentary from the hull and remove it.
- If it was put in with a product similar 3M'south 5200, & does not want to break free, sliding a three foot pipe over the wrenches handle will give you the leverage needed. You can also utilize a pipe wrench on the threads to break it gratuitous just this will ensure total destruction of the thru-hull.
- If all of the above methods fail to break it costless from the hull use a 4 1/ii inch bending grinder and grind information technology out being very careful not to get information technology besides hot from the grinding so yous burn the hull.
A Close Up
Here'due south a shut upward view of the step wrench, and it's slots, inserted into a thru-hull.
The Dogs
This photo shows the dogs or ears inside the thru-hull that allow the slot on the footstep wrench to grab hold and interruption it complimentary or tighten information technology.
Making Backing Plates
Unless your hull is shut to an 3/four″ thick, of solid fiberglass, you lot're going to demand bankroll plates for the seacocks. Backing plates are designed and used to distribute whatever stress loads over a larger footprint and to reduce and minimize whatsoever flexing of the hull at the seacock to minimize the chance of leaks.
While near gunkhole yards and DIY boaters utilise wood, because information technology's quick and easy, at that place really is a more permanent method and that is fiberglass, the same cloth your hull is fabricated of.
Of course if you have a beautiful quondam wooden gunkhole don't use fiberglass. Many forest backing plates tin can still somewhen absorb moisture and then swell and contract. Over time this can pb to a possible compromise the fit of the seacocks and the h2o tight integrity. Most wood's are likewise far softer than solid fiberglass so it tin can flex some with the abiding opening and closing of a seacock.
Many folks swear past blanket the wood with epoxy, which I've done over the years, but in my experience, it really does not accept that much more endeavour to make them out of fiberglass.
I use ssolid fiberglass for backing plates exclusively and then these instructions show how to do that. If y'all desire to use woods just replace the "epoxy" or "kitty pilus" step with a product like Sikaflex 291 or 3M 4200 and secure the wood to the hull with that.
Fiberglass backing plates are easy to make only yes they are admittedly a little more time consuming. The do good is that in one case yous accept glassed these into the boat they will final a lifetime and never need replacing. Even if you replace the seacocks ten+ years downwardly the road the backing plate can exist re-used.
My motto;
"Whatsoever task worth doing, is a job worth doing right."
Morris Yachts for instance, ane of the highest quality builders in the United States, currently uses solid fiberglass for their seacock installations on both their cored and solid fiberglass hulls. I personally experience wooden backing plates are a compromise but please do remember what you paid for this opinion when making your ain decisions.
TIP: To salve yourself fourth dimension Thousand-ten (epoxy resin & fiberglass) or GPO-3 (polyester resin & fiberglass) pre-formed sheets tin can be used in identify of abode made fiberglass sheets.
Fiberglass Backing Plates:
To brand solid fiberglass bankroll plates you volition need the following items.
- Fiberglass laminating resin & hardener + some finishing or waxed resin.
- Fiberglass in both 18oz Woven Roving and a standard 6oz Fiberglass Textile.
- A 24 X 24 inch piece of relatively thick glass.
- A Fiberglass roller.
- Mold release wax for the drinking glass.
To make the bankroll plate board wax the glass and begin laying upward, wetting out, rolling & alternating the layers of roving and cloth until you lot have a fiberglass lath approx five/eight″ thick. The whole laminating process may accept you lot 30 minutes. The finishing resin goes on as the concluding coat so it does non dry tacky.
You may as well be able to find bit pieces fiberglass around your boat grand. This would save some time instead of laminating the backing plates yourself. Fifty-fifty ii thicknesses of thinner fiberglass epoxied together is less work than actually doing the laminating. So inquire around at the yard you never know what you might find.
What about Starboard?
OK I've had numerous questions about the use of the plastic marine lumber Starboard and it'due south many knock off iterations such every bit SeaBoard. Starboard is non a suitable production for a backing plate.
- Starboard is far to flexible to offer any sort of rigid stiffening to the hull.
- It does non stick well to any adhesives, which includes bedding compounds such equally 5200, 4200 or Sikaflex and the manufacturer even backs this upwards. Starboard backing blocks tin lead to leaks beneath the waterline!
- The concept of a bankroll plate is to become one with the hull, make it thicker and add stiffness so the seal between the hull and through hull is not compromised and does not flex or move. Starboard fails in all these areas..
Starboard is a great production for many uses just not one where bonding to some other substrate is required or rigidity is required. Use Starboard or other similar products at your own gamble and avoid using it below the waterline..
Cutting Your Backing Plates
Later on the fiberglass lath has cured yous can and then proceed to drill your bankroll plates. This is much easier said than done. You will demand at to the lowest degree a 5.5 to vi.5 inch hole saw and a very large and powerful drill. A Milwaukee Hole-Hawg® works well.
The friction of the 6 inch hole saw, on the fiberglass hole, is tremendous and can and will impale a wimpy drill. I use my drill press for this but a large and powerful ane/2 inch drill from the likes of Milwaukee, Porter Cablevision or DeWalt is a blank minimum. Home Depot will hire you large drills and I advise this if yous don't have a drill that is upwardly to the task.
Trust me you lot will kill a Black and Decker or Ryobi earlier you even make information technology half style through your first hole.
One word of advice on drilling these backing plates is clamps! Past this I mean ever clamp your work downwards before you brainstorm drilling or you'll have a behemothic spinning fiberglass saw on your hands.
Circular fiberglass bankroll plates are certainly the best looking but tough on the hole saws and as well much for inexpensive drill motors. Another practical alternative is to cut a hexagon or octagon with a miter saw or table saw. This method will be faster and easier just non as keen and leads to lots of waste product textile.
More than Tools
In whatever job the correct tools volition save yous money in the long run. When dealing with below water applications this is especially true. For your thru-hull fittings you'll want a properly sized hole saw for each of the sizes you're using. This photo displays a properly sized pigsty saw for the task and a smaller 1 on the arbor.
What is a Seacock ??
A seacock is simply a valve with a built in flange into which a thru-hull/peel fitting fitting is inserted. In a proper seacock the flange is through-bolted to the hull passing all the way through hull, the backing plate, the flange and the statuary bolt heads are then countersunk and faired over with filler on the exterior. A seacock can as well be a thru-hull and valve used together without flanges. The caveat here is that they demand to meet the minimum strength requirements and do non have a thread-mismatch.
A flanged seacock or a flanged adapter, equally pictured above, is far stronger and as well much safer than screwing a ball valve directly onto the thru-hull plumbing fixtures. The cross section of a threaded thru-hull fitting very thin. Because of the threads cut into it, and the full-menstruum design, information technology becomes easier for it to break off. All it takes is a tool box or other large or somewhat heavy item to slam into the valve and snap the thru-hull off to sink your boat.
Why practice I focus so much on proper seacocks? I had this happen to me & my family unit back in the ninety's. A spare alternator hit a through hull on our old Catalina and cracked it. While the water did non rush in, and the crack was pocket-sized, it was a stressful ordeal that required a haul out and repair. It is the reasons I at present only use flanged seacocks or flanged adapters.
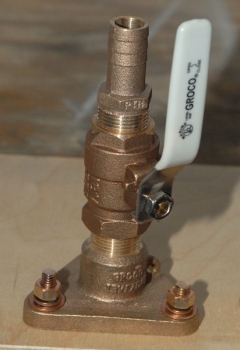
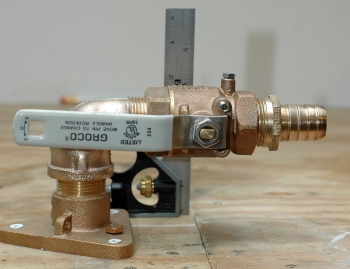
The flanged adapter is a relatively new concept in seacock applied science from Groco.
In the traditional sense information technology's not what ane thinks of when they think of a proper seacock but it certainly has some benefits over a 1 piece seacock. I chose to use flanged adapters for a few reasons over a seacock with an integral flange and valve.
First they let you to replace just the valve portion, in the hereafter, without ever having to supervene upon the flange or worse ripping out an unabridged one-piece seacock. Second they accept a standard NPS or straight thread thru-hull into the bottom and a standard NPT or tapered thread ball valve threads onto the pinnacle thus eliminating the dangerous mismatching of threads.
Groco, however, is not the but game in boondocks and products like Spartan Marine's tapered cone statuary seacocks tin last well in backlog of xxx years. I have many Spartan seacocks out there pushing upwards of 35+ years old. I besides have some old tapered cone valves in a box in my befouled that came out of a 72 twelvemonth old forest boat that was re-planked. Those valves, cleaned up and lap fitted, yet work perfectly to this twenty-four hours.
Many folks are also happy with Marelon which are also resistant to corrosion. Choosing a seacock configuration that allows you to sleep at night is what's most important.
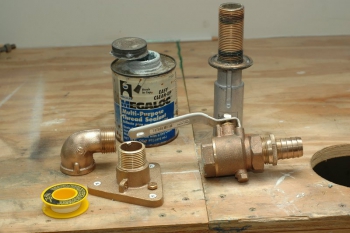
In this photo you tin can come across the flanged adapter screwed to the work bench, the thru-hull on top of the footstep wrench, the bronze ball valve, a statuary street elbow, teflon tape and some pipe dope.
If you lot click the photo & blow information technology up you'll meet the difference between a tapered thread (on top of the flange) and a direct thread (the thru-hull). This should give you a better understanding of why a NPT ball valve, like the one pictured, should non really be threaded directly onto a NPS thru-hull.
Hamilton Marine in Portland, ME stocks the Groco IBVF Flanged Adaptors
Dry Fit
For this particular valve I unfortunately had very petty clearance and needed to plow ninety degrees. I don't like doing this equally it adds another plumbing fixtures simply on some boats you lot have little choice. In this photo I am measuring the assembled height ahead of time to ensure information technology will fit the boat. Please note that the xc degree elbow is the aforementioned bronze let as the flanged adapter and valve, 85-5-5-5 statuary.
A dainty characteristic of the bronze Groco ball valves is the handle can exist used in two dissimilar orientations for either a right or left close or open. Past but moving the handle stop set screw, to the other hole, you can position the handle to open up or shut on the opposite side.
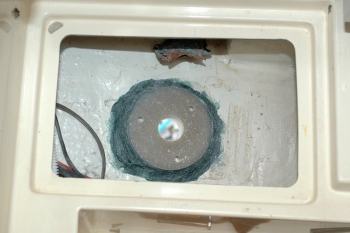
Glassing In The Backing Plates
In this photo I've glassed the bankroll plate to the hull, dry fitted it and drilled information technology. The picture as well clearly shows why this installation needed a quick 90 degree plough for the seacock. While not ideal the seacock remains accessible and in that location is zero, zero & nada in this compartment to perhaps interfere with it.
To tackle this part of the process you lot'll need a few things.
1- The offset particular is an electrical drill and a coarse contumely bicycle to fit in the drills chuck, or an aggressive grit sand newspaper.
2- The second is some fiberglass kitty hair, Yeah, it'due south really chosen Kitty Hair. Kitty Pilus is a thick fiberglass filler mixture consisting of of long strands of chopped fiberglass mixed with a peanut butter consistency resin. The 3rd detail is a 3 inch bolt, that fits the airplane pilot hole from the hole saw, and some Acetone.
Yous tin can also use Westward System, System Three, 1000.A.S. Epoxy or any of the other epoxy based resins and your favorite filler. Regular old polyester fiberglass cures rapidly though and bonds very well to a properly prepped surface. While polyester kitty hair is non as tough as an epoxy it's more than than strong enough for installing backing plates.
Installing the backing plate:
To begin the process you lot'll want to insert the brass wheel into your drill and rough/scar upward both the hull'due south surface and the backing plate or use a low dust sand paper. I commonly apply my Fein Multi-Master and carbide rasp but for this location it did not fit. Using a contumely wheel, instead of sandpaper, creates nice deep scratches on both surfaces ensuring tenacious adhesion of the backing plate to the hull.
Side by side vacuum upward any dust and wipe both surfaces with Acetone. At present your ready to mix the Kitty Hair or epoxy what ever you chose. Follow the manufacturers directions on the can for both temperature and humidity and then mix it until y'all have a uniform color. In near cases the Kitty Hair hardener is bluish then you tin can hands tell that it'due south mixed thoroughly.
TIP: I prefer the use of colored hardeners with polyester or vinylester resins so you can hands tell when the resin or mixture is well mixed.
To adjust the backing plate, and eye information technology over the existing hole, insert the three inch bolt through the hole saw's guide hole. This will make it easy to center when y'all are out side the boat. You'll exist able to grab the bolt and move the plate until it'due south seated and centered. Once the bolt has been inserted through the backing plate, spread a judicious amount of the Kitty Hair mixture on both the hull surface and the backing plate, then place information technology over the hole merely don't push down or seat it only yet. At this point climb out of the boat, grab the bolt, and centre and seat the bankroll plate into position. Now climb back into the boat and smooth the Kitty Hair with your finger, beingness very conscientious not to move the backing plate, until you have a nice smooth fillet.
Dry Fitting The Seacock
Now that your backing plate is installed and cured the showtime thing to do is to drill your hole for the thru-hull. This is fabricated easier because yous have already centered it over the sometime pigsty and already take a pilot pigsty in the center of the bankroll plate left over from the large hole saw you fabricated the backing plate with. Now you but choose a hole saw, to match your thru-hull's diameter, and using the existing pilot hole, drill your new mushroom-head / thru-hull hole.
Once that is washed you'll need to thread the thru-hull upward into the flange and measure information technology for length. In near cases the thru-hull will be besides long and need to be cut to size. Cut the thru-hull stem is easy.
Measuring for thru-hull length:
1- With the thru-hull bottomed out into the flange measure from the outside of the hull to the mating side of the mushroom-head. Take this measurement and add 1/iv of an inch.
two- Insert the thru-hull into a vice carefully clamping the threads that demand to be cutting off, non the threads your keeping.
3- Using a hack saw cutting the thru-hull to its required length.
iv- Clean the threads yous only cut with your drill and brass brush.
TIP: I utilise Lenox hack-saw blades & hole saws and they outlast cheaper stuff nearly five:1.
Now that you take the proper length thru-hull, re-insert it into the flange and tighten information technology down by hand. Climb dorsum into the boat and accommodate your seacock to align it with information technology'southward hose for proper orientation. In one case you have everything aligned, and situated where you lot desire it, drill your flange bolts holes, one at a time. Afterward each hole is drilled insert a bronze bolt. Inserting a bolt, afterward drilling each hole, guarantees proper hole alignment by the time you lot get to the last one. Doing this past eye, without bolts, leaves room for the seacock to twist and a potential fit failure. There is no room for error with fiberglass similar in that location is with wooden bankroll plates and all bolt holes must be perpendicular to the hull as well as perfectly centered and aligned for fit.
The adjacent step is to countersink the auto spiral heads into the hulls exterior. Once again having the proper tool, in this instance a countersink, is imperative. Not simply must you lot utilize a countersink but it needs to be the right size for the silicon bronze slot head automobile screws. Using a regular drill chip for countersinking is a huge no, no. In the picture the holes have been properly countersunk and the thru-hull hole, in the hull, is over an inch thick of solid fiberglass.
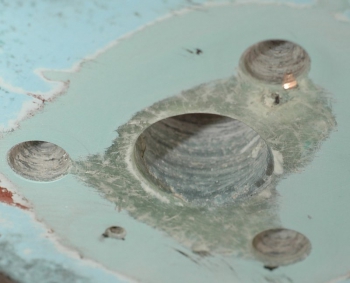
Countersink The Flange Side
In this photo I still need to countersink the flange side of the commodities holes slightly. The reason you want to do this is to create an o-band similar effect of marine bedding chemical compound surrounding the threads. If y'all don't countersink most of the sealant will clasp out when you tighten everything down leaving very petty to prevent a leak.
The premise and design is that water should never even go to the top side of the bankroll plate but merely in case it's best to countersink slightly and brand and create an o-ring effect.
Countersinking any hole, where marine bedding compound is to be used, is a expert idea especially with deck hardware. This slight countersinking makes a prissy h2o tight gasket and too prevents crazing of the gelcoat from the sharp and abrupt edges a straight drilled pigsty creates.
Flanged Adapter With Statuary Ball Valve Ready To Install
At this bespeak I've practical some Sikaflex 291 marine sealant and am ready to install the flange. If yous look very closely you'll see that the flange has been slightly countersunk then it's ready. First utilize the sealant to the flange, in the style shown, then generously circumvolve the car screw heads with sealant and feed the bolts up through and into the boat from the outside.
Now carefully set the flange onto the bolts. Thread the nuts and washers onto the bolts, finger tight, and so climb back outside the boat. Thread the thru-hull fitting into the flange and climb back into the gunkhole.
To tighten the nuts, with only one person, I detect it much easier to use an bear on driver. I utilize a cordless Milwaukee M12 simply in that location are now many small-scale impact drivers. Exist very careful with the affect commuter as you don't want to over torque them. These cordless bear upon drivers are now very powerful and tin can literally snap a v/16″ Ten eighteen bolt if you're not conscientious.
An affect commuter is a great tool that will tighten the nuts without having to have a 2d person exterior the gunkhole with a screw commuter.
Once the basics are tight climb back out of the boat and remove the thru-hull fitting. Clean it with Acetone then lather information technology up with a marine sealant of your selection. Now utilize a step wrench, and a large adjustable wrench, and tighten the thru-hull into the flange from exterior the gunkhole.
Once everything is tight clean up the ooze from the sealant, including whatsoever that oozed out up inside the through hull and around the outside. Be certain to clean excess sealant from the counter sunk bolt heads then you lot're ready to make full and fair the exterior with a vinyl ester filler such as 3M Marine Premium Filler.
3M Marine Premium Filler is a unique vinyl ester formulation designed for marine filling and fairing applications above or below the waterline. I would avoid the use products or fillers like Bondo or Evercoat beneath the waterline as they can absorb moisture. Make sure you're using either an epoxy based fairing compound or a vinyl ester fairing chemical compound to minimize moisture intrusion.
So why do I apply Sikaflex sealants or bedding compounds rather than 3M products? That'southward an piece of cake one for me to answer. In my experience I've found it less aggressive in it's adhering properties than 5200, something I really like for time to come repairs. I've had vast amounts of experience, over thirty+ years, with many marine sealants and have really grown to like the Sikaflex products.
If there is one thing I've learned, in 30+ years of boating, it's that almost nothing on a boat is permanent, not even a keel articulation. In that location really is little to no need for a sealant as permanent as 3M 5200. I suspect 3M 5200 was invented to ensure future boatyard revenue. (grin)
Now don't get me wrong I'm non proverb, in any way, that Sikaflex comes autonomously like butter, it does not, but it comes apart easier than 5200. Try Sikaflex 291 & you'll similar information technology'southward adhesion, flexibility and long life.
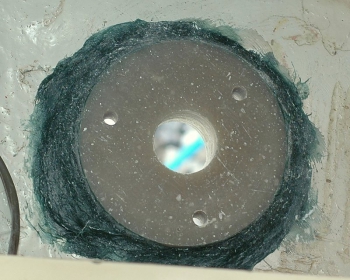
Outside View of Installed Thru-Hull
Every bit you lot can run into in this photo the silicon bronze commodities heads are countersunk and well-nigh of the backlog Skiaflex sealant has been wiped away.
Of import: If your vessel lacks the peel-thickness for through-bolting and countersinking the heads practice non through bolt! Some boats exercise non have thick plenty hulls for this!
The side by side pace is to fair over the bolt heads with 3M Marine Premium Filler to get a prissy smooth hull with no visible bolts.
After the fairing pace I also did a complete bulwark coat of the area for added moisture protection using Interlux Interprotect 2000 series barrier coat. This stride is non 100% necessary but I wanted to protect and prevent any water intrusion into the recessed commodities holes as I could and besides protect the hull where I had sanded sparse the original gel coat..
A Few Words of Caution
WARNING: If you lot are one of the thrifty types who think marine rated products are a bogus marketing ploy delight don't end reading here.
This is a photograph of a one year sometime xanthous brass Home Depot brawl valve installed by the previous owner. When I asked this seasoned canoeing veteran why he used a ball valve from Home Depot he said;
"It was only in a pinch while coming up the ICW only after it was installed I forgot to supervene upon information technology with bronze."
This Habitation Depot valve was in apply for about 8 months, of total in-h2o time, and the ball, inside the valve, was completely gone, not there, corroded away.. This valve was literally weeks away from catastrophic failure of the boat sinking type.
Be Certain WHAT You lot ARE Buying IS MARKED UL MARINE
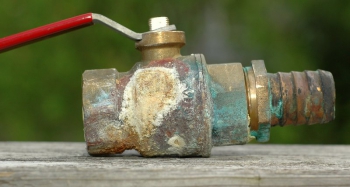
This is What the Exterior Looked Like
This is afterward simply eight months of use. Over again delight practice not inexpensive out on your beneath h2o metals.
Gelcoat Applied
In one case the seacocks accept been installed you lot can add a nice touch by re-gelcoating the area.
It is not also difficult to get a decent color match, this one I did past eye, and it was just virtually spot on. Be sure to use "waxed" gelcoat, or an air inhibitor, for the final glaze or it volition remain tacky. Always stir waxed gelcoat before you dip your brush or roller in. This will keep the wax thoroughly mixed.
Personally, I am non a fan of paint in a bilge surface area, only if yous are, you can use that likewise. I merely prefer the durability and bonding of gelcoat over paint in damp areas.
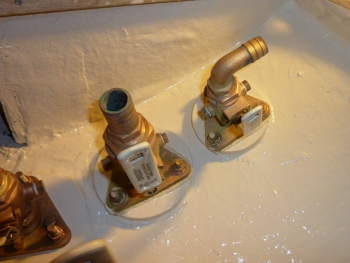
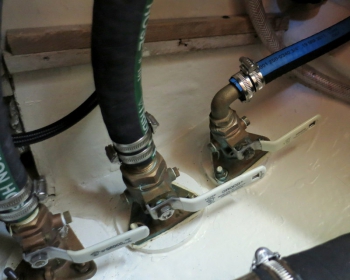
The Finished Product
This is the finished production afterward a few seasons use. These seacocks are for; head sink, macerator pump & caput intake. I prefer to utilize heavy duty mandrel formed marine hose, such every bit Trident or Shields, for all below waterline connections. I too prefer to use AWAB non-perforated hose clamps & I always double clench below water applications.
Remember to close your seacocks when you leave the boat. The best way to ensure your seacocks will last and work equally they should, for years and years, is to simply apply & do them.
Proficient luck and happy boating!

How To Repair Water Intake Valave On Boat Livewell,
Source: https://marinehowto.com/replacing-thru-hulls-and-seacocks/
Posted by: hubbardwallecurese43.blogspot.com
0 Response to "How To Repair Water Intake Valave On Boat Livewell"
Post a Comment